Sugar Scrub {DIY}


Thank you so much for stopping by!  I am so glad you are here!!

This past weekend, I went CRAZY making sugar scrubs.  I have always loved them and loved giving/getting them as gifts, but I never really made any myself.  Until now...  I went through blogs, Pinterest, books to find the best 'recipe'; one that would suit my likings and those of my friends.  So, I came up with this:

Sugar Scrub

1 Cup Sugar (granulated or brown works best for me;
I also like Baker's Sugar-smaller granules)

1/2 Cup Coconut Oil (melted) (I LOVE the smell of coconuts!!) 
But, if you'd rather use another oil,
you can do Sweet Almond Oil, Grapeseed Oil, Olive Oil.) 
Be careful with Olive Oil.  It smells weird when you mix it with other Essential Oils.  But, if you like its smell, go with it!!)

15-20 Drops of Essential Oil
 (you can use more or less, depending on what your preferences are)

Citrus & Eucalyptus:
Lavender & Vanilla (I used Pure Vanilla Extract for  'flavor'):
 Coffee Coconut:
 
Add all the ingredients together and mix well.  Put the scrub into mason jars, tubs, containers that you like.  Decorate as preferred. 

Here are some of the items I used to decorate the mason jars--washi tape, scrapbook paper, cardstock:

Do you have any recipes for Sugar Scrubs?  Do you enjoy making them like I do? :)  Let me know...


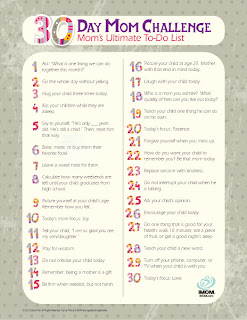
iMOM 30 Day MOM CHALLENGE

I found out about this iMOM 30 Day Mom Challenge.  It looks really interesting and fun, and I have decided to give it a try!  I am so not good at follow through, and I am working on this...  {Hence, the reason I haven't been able to stay on path for eating healthy and exercising.  But, that's a different story! :)}

Here are the 'ideas' on how to complete this challenge.  It comes from the iMOM site:  30 ways, in 30 days, to be the best mom you can be.  For each day of the month, find the corresponding number and follow the tip. So, if you begin the challenge on June 9; start with tip 9 and move on from there. You can repeat the list every month!


If you are going to try this, too, let me know!  I love seeing and hearing what other people are completing on the same project I am doing!  Please wish me luck, and look out for posts from me updating on what I did that day for the project!  I am starting tomorrow, May 29th...

Take the challenge with me!  


~Kim

Busy Bottles for Kids {DIY}


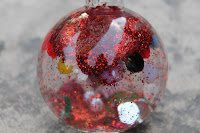
For the Summer Survival Challenge I am doing, a part of it suggests that we make a quiet time activities list for our children.  I made a good list of activities that I will have upcoming (DIY) posts on...  Some of my ideas were: file folder games (DIY); puzzles; Leap Pad or iPod; felt boards (DIY); beading-pipe cleaners, yarn, etc. (DIY); writing and letter tracing; coloring and drawing practice; sorting games (DIY) and Unifix cubes.  My last idea was something that I saw on a Sensory Processing website awhile back: Busy Bottles.  Not only were they fun for me and my son to make.  But, he enjoys looking at them and 'finding' what items are in there (like beads, buttons, pom poms, etc.).


Here are all of the things you will need for this project:

Small Plastic bottles
(I found these bottles at our local CVS pharmacy.  They had a sweet kids drink in them, so I just dumped it our and removed the label)


A variety of colorful, water resistant type of items: rhinestones, beads, glitter, pom poms, pearls

Water

Hot Glue Gun

1.  Empty the bottle(s) and be sure it is clean and not sticky. 
2.  Put the colorful items and glitter in the plastic bottle(s).
3.  Add water, but leave a bit of room at the top.
4.  Twist top onto the bottle and make sure it's tight.
5.  Hot Glue the cap onto the bottle.

That's it!!  This is a fun thing for kids to look at and keep them quiet (for a few minutes, at least) because they helped you make it.  The kiddos just LOVE to play with things that they helped make.


Have you ever made a busy bottle?  Oh, have you tried making a vortex out of two 2-Liter plastic soda bottles??  Here is where you can purchase the connector to make one:


Easy Peasy!


Thanks for stopping by,


Clean Sink = Happy Mama


I posted a picture of my spic 'n' span kitchen sink on Facebook the other day:


I had promised a post on how I did it, so here it is... 

I got the idea of having a clean kitchen sink from The Fly Lady.  I came across one of her posts, FLYing Lesson: Shining Your Sink.  She was so right when she said that "You have struggled for years with a cluttered home and you are so beaten down."  Just having the dishes done and a clean kitchen sink when you get up in the morning is such a sense of accomplishment and it is!!  I definitely was a happier mama when I woke up that first morning and had NOTHING in my sink.  I just couldn't believe the effect it had on me!!  And, it can have that same effect on you, too...  

Start by taking all the dishes out of the sink.

Run some very hot water into the sink and fill it to the rim. If you have a two-sided sink, only do one side at a time. Then, pour a cup of household bleach into the hot water. Let it sit for one hour. Now, pull the plug with a pair of tongs. If you don’t have tongs, then scoop some of the water out of the sink into the other sink and use your hand to pull the plug. Make sure you wear gloves so the bleach doesn’t irritate your skin, and don’t get the bleach water on your clothes.

Rinse your sink well.

Use some powdered cleanser (Comet, Ajax, or baking soda) and scrub your sink. Be sure to rinse ALL of the cleanser from the sink.  (I used Bon Ami--with the cute little chickadee on the label.)

Take a sharp edge, such as a butter knife, and clean around the rim of the sink, just like you would clean dirt out from under your fingernails.

Clean around the faucets.

(Don’t have a fit if someone doesn’t take as much pride in your sink as you do. It is very easy to fix. You have already done the hard part; you will never have to go through this process again. Daily maintenance will keep it looking this way all the time. Nasty, hurtful words are not as easy to repair. Just be sure and tell your family what you are trying to do. They will think you have gone crazy.)

(The parts above were taken right from the FlyLady's suggestions.)

And, the clean and clear sink is still going strong.  Love the feeling...

Did you try this, too?  How did it affect you?


SUMMER SURVIVAL CHALLENGE: Week 2


Time for another update on the Hello Mornings Summer Challenge.  Last week, we read through the planner, made loads of lists, etc.  This week, Jenni is still having us make lists for our homework for this week's Meetings and Test Runs theme.

Here is my schedule for the Summer Challenge for the week:

{Monday}       
Plan your Morning Routine

{Tuesday}       
Brainstorm Family Traditions

{Wednesday}  
Schedule a Family Meeting

{Thursday}     
Schedule a Kick-off Event

{Friday}          
Weekly Planner Worksheet (Practice Run)

{Saturday}      
Weekly Meal Planning/Grocery List (Practice Run)

{Sunday}         
Be Summer Organized Worksheet

Last, but not least, Susan Heid of The Confident Mom posted an audio blog on her site about our Summer Challenge.  Take a listen...


Easy Teacher / Aide Gift: CRAYON CONTAINER


Hi there!  I discovered this simple teachers gift through none other than Pinterest.  There are so many variations out there, but I decided to do two small, but wide containers.  Getting the 'pattern' decided was the hardest part to this project!! :)

Here's what you'll need:
3-4 boxes of crayons, depending on your container
Glue Gun
Empty container: plastic, glass (from the dollar store), cans, cartons, whatever is available
Ribbon (optional)


I started with sorting the colors and shades together:  I put all of the reds together, then all of the oranges, etc.   Once I completed that, I figured out which patterns I wanted the crayons in.  We have 2 teachers at my son's preschool, so I used two different patterns.

The first one was the hues together: all the reds/pinks together, then all of the oranges/peaches, then all of the yellows, and so on.

The second one was the traditional rainbow colors: reds, oranges, yellows, greens, blues, and purples.  Here's a picture of that one as well:

After I decided on the patterns, I started hot gluing them onto my plastic container.  (They were actually powdered shake containers that I cut in half.)

I made sure that the {Crayola} was facing the outside, just so things could be uniform.  When I finished gluing the crayons all around the containers, I finished it up with coordinating ribbon.

I'll likely be filling these with candies and a gift card, or some pens/pencils, highlighters and the like.

I enjoyed making this simple project, and I know you will, too!

Here are some more pictures for you...


Linking to:
The Shabby Nest
A Peek into My Paradise
Monday Funday @ C.R.A.F.T.

SUMMER SURVIVAL CHALLENGE: Week 1


Yes, yes...  It has been awhile since of posted.  But, I hope to be more consistent now.

But, the reason I am going to be much more consistent is because of this weekly challenge for the summer that I found through the Confident Mom Facebook page.  It turns out that Jenni over at Hello Mornings blog is going to be breaking the Confident Mom 'summer planner' for us, so that we can p.l.a.n. an enjoyable summer!!

So, we will be having weekly homework (I do miss school somewhat??, so this should be doable).  The first action item is to block out 1 hour of time each week for the next three weeks of assignments.  So, I am going to use 10 minutes per day, for each of the 7 days.  I plan on completing 1 homework assignment per day--it's only 10 minutes of my time...  I can do my "time" in the bathroom--a well needed break out of my hectic days!!

The first week's assignments are:
1.  {Monday}  Read the entire The Confident Mom’s 2013 Summer Survival Calendar
2.  {Tuesday}  Assess and tighten your current schedule--make space
3.  {Wednesday}  Complete the Quiet Time activities worksheet 
4.  {Thursday}  Complete the Important Summer Dates worksheet
5.  {Friday}  Complete the Ideas for Summer Fun worksheet
6.  {Saturday}  Complete the Summer Goals worksheet
7.  {Sunday}  Determine goals on the Standard Operating Procedures and Expectations worksheet

Wow!  That's all for this week...  I'll keep checking in on the progress of my 'summer journey'.  Let me know if you're going to do this plan or something similar!


Thanks for stopping by...